Saturday, 13 October 2018

Winter experiment in off-grid living


October has arrived! Transition time in the ‘off-gridders’ calendar.

For sail boat off-grinders, October usually signifies the end of the season. Time to get tucked in somewhere safe and ride out winter.

Last winter I moved into a marina for six months. I thought I would enjoy plugging in to the system. Hibernating and hunkering down. Doing boat jobs. Researching new and exciting sailing grounds in prep for next years sailing season.

I didn’t. I plugged in and used a massive £5 of power. Yes, £5 for electric, for the whole six months. It wasn’t the marina, or the location. Both were fabulous. It was that I’d spent the summer afloat, enjoying total freedom. Learning to fish and gather oysters. Cooking on beach fires. I’d explored the boundaries of my solar panel and wind generator. I’d ridden out wild storms at anchor and deepened my trust in my ground tackle.

In truth, I got brave. I tested myself constantly. I absolutely loved discovering that I COULD be semi self sufficient!

Then six months over winter in a marina just sucked the buzz out of all that.

So here I sit. It is October 10th. I am in the cockpit, in the sunshine, in my shorts. It is 19 degrees. There is a warm south easterly blowing, occasionally gusting 26mph and kicking free power into my wind generator. I have plugged my new cordless drill into the inverter to see how long it will take for a full charge.

As the season end approaches this year, I am giddy! My winter will not be about hibernating in a marina waiting for next years sailing season. It will be about planting trees and exploring new territory on that slither of land in the sunshine I purchased back in February!

This summer has been a wonderful mix of sailing, freedom, making new friends and living afloat. It’s also been about collecting seeds, researching planting, and off-grid systems on land. I have plans to build a jetty, a composting loo and a geodesic dome home/greenhouse!

So come the end of October, when I put the boat to bed for the winter, I will be driving down to my little piece of land in the sun. I’ll be laying down roots and satisfying the other side of me. I’ll be learning to live on land.

Lucky for me, October also happens to be planting season in Portugal!

Here’s to new adventures this winter.


Thursday, 23 August 2018

Choosing native tree species for new food forest in Portugal

Although I'm living on my beautiful boat, located in one of the most desirable cruising grounds in the UK, I still hanker after the smell and feel of dirt under my fingernails! The thrill of planting and harvesting, of tinkering with permaculture. True, I love the wild abandon of living on a boat, but I also miss tending a garden!

So, I've bought a little Quinta on the bank of the Rio Guadiana, just north of Alcoutim, Southern Portugal. It's an off-grid haven and a hive of boaty activity. A great place to spend winter when the south of England becomes a little too chilly for living on a boat.

I've been looking for this place for a long time now. Although I didnt know this was THE place. It's a wild little spot...sunshine drenched, and populated by old salties who have crawled ashore from their own boats, to set up farm and put down some roots.

A little piece of boat loving, land loving heaven!

Over the next couple of years I plan to spend the sailing season exploring the South coast of UK and the Channel coastlines, and the winter down in Portugal planting and building, working, loosely, towards establishing a land-based haven in the sun. The bonus of this place...at some point in my future, I can anchor the boat at the end of the garden! How fricking cool is that!

Anyhoo, winter is approaching - which is the primary growing season in The Algarve - so I'm gathering and researching tree species for my first mega planting session. I want natives, drought tolerent, edibles. I want to plant LOTS of trees!

I've discovered the Myawaka method of planting which is closely packed planting, to recreate a natural forest, self sustainable system. Reforestation of native forest - Miyawaka Method.

I'll update the lisy below as I discover new varieties.Please suggest in the comments if you have any ideas or recommendations for species to include.

Ongoing list...

Shrubs/Aromatics
Rosmarinus officinalis (Rosemary) perennial, evergreen, herb, drought tolerent, 5ft tall,
Lavandula stoechas
Lavandula viridis (Green Lavender )
Erica arborea (Tree Heath)

Shrub/Fruit
Corema album - Edible (white and very acidic fruit)
Santolina chamaecyparissus 
Arbutus unedo - Edible (Strawberry Tree) [Medronheiro]
Sambucus nigra (Elderberry) 
Morus nigra (Mulberry) Edible, deciduous, 8-12m tall
Brambles (blackcurrant, redcurrant, Vaccinium myrtillus (billberry), raspberries, brambles)
Goji berry/Wolfberry (Lycium barbarum) deciduous woody perennial plant, 1–3 m tall

Shade-tolerant mineral-accumulators, nitrogen-fixers or medicinal 
Liquorice (Glycyrrhiza glabra) Pea/Bean family Leguminosae/Fabaceae perennial, herb, 1m tall
Oregon tea (Ceanothus sanguineus)
Comfrey (Symphytum officinale)
Witch-hazel (Hamamelis virginiana)

Ground Cover
Erica lusitanica
Festuca - Grass, Drought Tolerant, Sandy Soils

Trees
Pinus pinea (Stone Pine) - Pine Nuts/Pinhões [Pinheiro Manson] pine wilt nematode resistant
Pinus pinaster (Maritime Pine) [Pinheiro Bravo]
Cebrus artanica (Cedar) [Cedro]
Quercus suber - Cork [Sobreiro]
Quercus canariensis
Quercus rotundifolia [Azinheira]
Carya illinoinensis  (Wild Pecan)  Northern Pecan


Quercus pyrenaica (Perenean Oak) [Carvalho-negral]
Alnus glutinosa (Common Alder) [Ameiro] -
Fraxinus Angustifolia (Ash) [Freixo nacional]
Corylus avellana (Hazel) - Hazelnuts/Avela [Aveleiro]
Olea europaea / Olea europaes sylvestris (Olive/Wild Olive) [Oliveira/Zambujeiro Oliveira Brava]
Salix alba (White Willow) [Salguiro Branco]
Tamarind tree (Tamarindus indica)  
Dunstan Chestnut (Hybrid of Chineses X American Chestnut)
Butternut ( Juglan cinerea)
Burr Oak
Macadamia? 

Sweet Chinquapin 
Sweet burr oak
Ginkgo biloba - Ginkgo


Castanea sativa (Sweet Chestnut)
Silver birch (Betula pendula)
Holm oak (Quercus ilex)
Rowan (Sorbus aucuparia)
Hornbeam (Carpinus betulus) shade-tolerance
Poplar (Populus alba) - fast growing
Lime (Tilia cordata) edible sap, leaves and seeds 
Italian alder (Alnus cordata) fast-growing, nitrogen-fixer drought tolerant, edible sap

Fungi
Boletus edulis (Ceps) - Autumn Harvest
Cantharellus cibarius (Chanterelles) - Autumn Harvest
Craterellus cornucopioides (Horn of Plenty) - Autumn Harvest

Wildflowers
Limodorum abortivum (Violet Limodor) 

Nitrogen Fixer
Comfrey (Symphytum officinale) 
White Clover 
Robinia pseudoacacia (Black Locust) grows rapidly, drought/frost tolerant, infertile/acidic soils 


Thursday, 1 August 2013

Recycling galore!

Here are ten alternatives to using Freecycle, just in case you have the recycling bug!
MySkip: a celeb-backed swapping site with photos
Freegle: a new breakaway set of groups from ex-Freecycle UK moderators
vSkips: a healthy reuse site with a simple design and over 25,000 "virtual skips"
Whatsmineisyours.com: the original clothes-swapping, or "swishing", site
Big Wardrobe: another clothes-swapping site that recently launched a national swapping "road show"
RecycleNow: an official government site that has a postcode service to locate your nearest recycling centre
Gumtree: popular for giveaways and classified sales. Fairly London-centric but very busy
Don't Dump That: forum-based reuse site along the lines of Freecycle
Seedy People: seed-swapping site for gardeners and allotment owners
LetsAllShare: Freecycle-style site with feedback ratings for users

Tuesday, 5 March 2013

Urban Permaculture


Excellent compact urban living permaculture design. Including vertical stacking, extended micro edges all beautifully designed and productive.

Water Kefir and Ginger

I've been eagerly awaiting the arrival of my quarter cup of Organic Water Kefir Grains (Tibicos) from this lovely lady on Ebay, and they finally dropped through the letterbox this morning! Yay!

So, with hardly a glance at what to do, I poured all my grains into two containers - half in one large rose coloured glass jug (left), and half in another smaller jam jar (right). Added tap water - although the instructions are to add filtered water (oops!) - a couple of slices of fresh peeled ginger to each container, and three tablespoons of unrefined demerara sugar to the jug, and one tablespoon of unrefined demerara sugar to the jar.

I mixed vigorously with a wooden spoon to dissolve the sugar, and left to stand on my kitchen counter top. The jam jar has a screw top lid and contains about a cup of water, and the jug I covered with cling film contains about half a litre of water.

This is day 1 - For more informed 'how to' check out this recipe on Whole Traditions.

Wednesday, 20 February 2013

Water Catchment Pest Management


I'm about to buy a small property with a stream fed/rainwater catchment system and know some of the problems with these kinds of systems are the potential for mosquitoes and other waterborne critters to get into the water and breed.

One brilliant idea I came across on the Ludlow Survivors Group was so simple, yet, so perfect, I had to share it here:

If you have problems with mosquitoes or other airborne nasties using the water stored for a solar shower and the toilets they can breed to highly irritating levels with accompanying medical problems.
due to the nature of a lot of these systems you may not be able to seal the containers adequately to prevent these nasties from getting in and laying their eggs, but the problem can quite easily be overcome with the addition of polystyrene balls (such as those used in bean bags) in a thick layer over the surface of the water.
This will prevent the mosquitoes and other nasties from accessing the water whist allowing the system to continue to operate as the balls float on the surface. They also conform to the contours of the storage vessel and can be prevented from accidentally accessing the system when drained by a simple mesh at the inlet. Water added to the system will simply push the balls out of the way and then they instantly return to cover it again.

The suggestion was made by Stuart at BCUK. 

Saturday, 19 January 2013

Cute reused milk container packaging

© http://permacultureideas.blogspot.co.uk/
Just discovered this cool little container made using recycled milk cartons, over at Permaculture Ideas.

I have been looking for a good REUSE for all those milk cartons for ages now - there's only so many seedling 'greenhouses' one can fit in one's garden patch - and now here's this cute little box container thingie to try out!!

For cool REUSE this novel idea has to take the biscuit - can't wait to give it a try.

Thinking about it a little more, these might also become the new cool packaging for my  Cyanotype Kits instead of the brown bags I'm currently using. If I can figure out how to make them work, a well as how to create them easily. They are just soooo funky!!

Now all I need is to find the little popper button fastening!
Oh and drink up my milk!


[EDIT]

Several cups of tea and milk later....

OKAY, I had to have a go... never have I wanted to drink my milk so quickly!!

Here's the first prototype in pictures, it's not pretty, but I learned a lot from the exercise and look forward to consuming my next carton of milk!

STEP 1
Drink milk, wash carton :o)

STEP 2
Mark out the cutting line - I have used pure guesswork here, but I think it's almost right - a few tweaks next time will make it much prettier. One thing to watch out for is making sure that each corner is the same height - I noticed (due to my tardy cutting and complete lack of measuring) that each corner was slightly different and the final container was a wee bit lopsided. I used a four pint carton here.


STEP 3
Make an incision/starting point with a sharp knife (I used a scalpel), then once you can fit your scissors inside, begin cutting around your drawn lines.


Once you have cut the basic shape out, you can now go around the edge and even up the corners and curves. If you want to get fancy, you could even go around the whole edge with crimping scissors!!! Whoah!

STEP 4
Fold in 'flaps' and measure the place where you will make the fastener.


I went for the 'use what you have' approach for the fastening and made a little straight incision on the main body, and a D shaped... erm... 'tongue', on the largest flap. The D-shaped 'tongue' hooks into the slice and holds itself in place, rather than sourcing/buying the little fasteners in the original post. Well that was the idea anyhow!


And... this works really well! You could adapt the fastening in all kinds of ways - different shaped tongues and flaps etc, or even using a hole punch and thread/twine to loop through and create a tie fastening!

Well, there you have it! Thanks again to the original post on Permaculture Ideas, this ugly little duckling has huge potential and I'll be trying this again once I get through my next couple of pints of milk!

If you have a go, please post a link to a picture of your creation. Lets keep more cartons out of the landfill!


Off Grid Living

Recently a little house (read: shack!) came on to the market that has, once again, piqued my interest in off-grid living. The property is very remote - accessible only by air or water - the small community uses mostly solar and wind to power their homes, and water catchment systems for their plumbing needs. Some also using additional generators, and wood burning stoves to heat home and water.

The seasons are split into two main types: warm and sunny summers, very wet and windy winters.

I'm currently researching as much as possible about options for the various 'services' that I consider must have requirements/desires (please suggest other areas if I have missed any) and will share what I discover here, for others on a similar path!
  • Heating
  • Generating a sustainable supply of wood
  • Sufficient hot water generation
  • Food growth and storage
  • Soil care
  • Water capture
  • Lighting
  • Transport
I would like to mention that I am not an expert, I'm just a regular kind of person looking for an alternative way of living - one that is mindful of available resources, and one that respects, and understands the difference between 'needs' and 'wants'.

I have lived semi off grid before, with stream fed water and a septic tank waste system, but we enjoyed the luxury of mains electricity. Solar only, will raise extra challenges and concerns and I'm also interested in learning about what those might be.

If others are doing/learning/experimenting with similar issues, please leave a comment and links, or just say 'hello'. I'm a sponge for knowledge at the moment!


Heating

Before considering the heat source - insulate, insulate, insulate!

One consideration is the solid fuel/oil/gas Rayburn/Aga option for space heating and water heating. One downside is that to generate hot water, one must keep the Aga/Rayburn working all the time! And once the water tank has been drained - that luxurious bath - then it might take a while to create another tankful. Another consideration is the potential for the space heater to provide too much heat during summer months, just to maintain hot water.

Reading the Green Living Forum, one person suggests an outdoor wood burning/hot water option - which does seem like a feasible option:
Perhaps these haven't appeared in the UK yet but here in the states there are outdoor wood furnaces. Looks like a little shed with a chimney and heats water which goes via insulated pipes to heat storage and house heating. I believe these mainly used because sometimes hard to retrofit wood burning (and here we often have a lot more grounds than you do; example, in this township houses may be close together in the areas zoned "village" but otherwise minimum housel ot is two acres).
If you have good chimneys and a basement how about a wood fired boiler down below? Might make the basement hot and dry but hey, could string clothes lines 
A hybrid option of this gets me thinking... would an outdoor version hooked up to a DIY underfloor heating system work?

Another person, also in the GLF touched upon wood burner underfloor heating:
I have under floor heating and pump solar heated water in the day and turn over to wood burner back boiler for night
But I am in Spain, so you would probably require a larger collector for the UK
Heat pipe vacuum tubes work very well and I am sure they would ok for the Uk
I've looked into various alternative DIY solutions for generating heat - preferably using wood (managed, grown and harvested at the property) - and will gradually post findings here.

The DIY solid fuel heaters made out of gas bottles are an interesting consideration.

The need to consider some form of coppicing - as I do not want to de-nude the property of wood! I cam across this site that discusses various options for coppicing varieties and their burn, growing and coppicing properties. Included are Eucalypts, Acacia, Casuarina, Cypress, Poplar, Alder and Pine.

Some helpful info from their site (www.mckechnienurseries.co.nz):

Eucalypts – very fast-growing firewood which burns hot and long. Eucalyptus nitens, E. botryoides and E. ovata, are all good coppicing varieties, and will grow in a variety of soils, from dry to wet.
Acacia (wattle) – very hot and very long burning. Acacia melanoxylon (blackwood) is readily available and will usually coppice. Grows in dry to damp soils.
Casuarina – (sheoke), hot and long burning. Grows in dry to damp soils.
Cypress – Cupressus lusitanica (Mexican cypress), a great shelter or timber tree, but also makes good hot burning firewood. It needs a reasonably well-drained site and is non-coppicing.
Poplar – not as hot or as long burning as the others listed here, but light to handle and worthwhile as fire-starters, or for earlier in the season, when you don’t need as much heat. Great coppicers, and excellent for damp or wet spots.
Alders – similar to the poplars for growth, habitat and performance.
Pines – medium hot and short burning.

Another option might be the DIY 'fire bricks' that some are making using recycled paper.

[ongoing as I discover more info - I'm posting this 'unfinished' as others may find this useful in its current form, or have interesting observations and contributions]

Other pretty neat 'wish list' items that I'll write/research about a little later include an outdoor sauna, outdoor hot water shower, outdoor bath tub, making cheese,


Further reading


Friday, 28 September 2012

Growing Horseradish


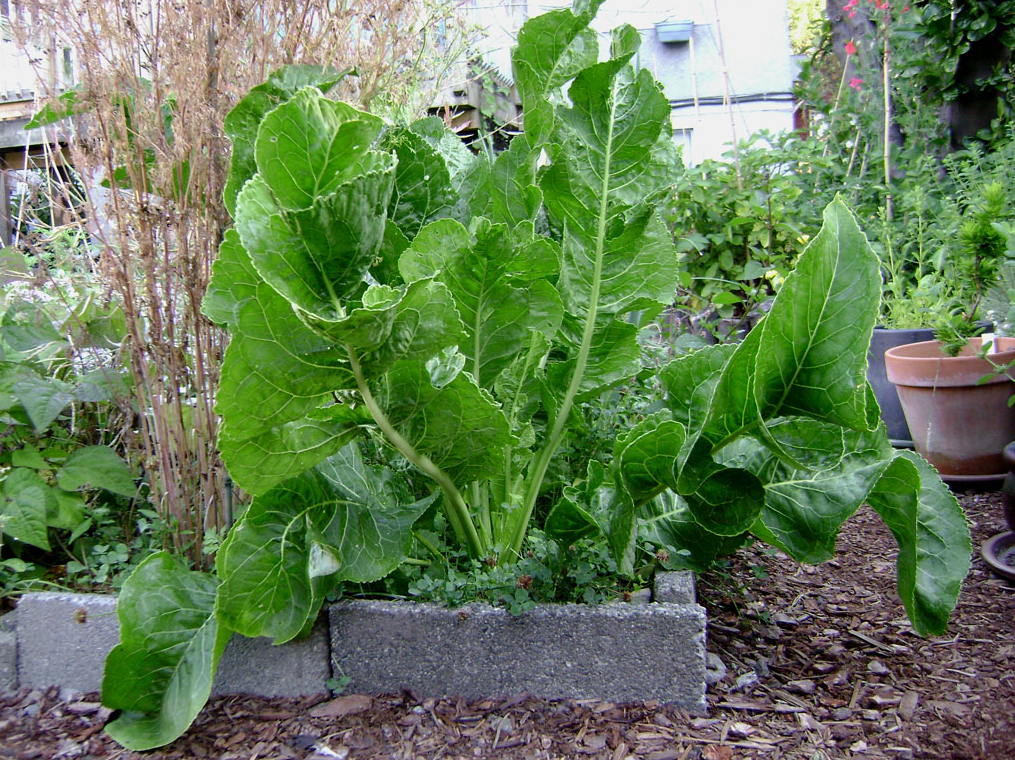
Horseradish (Armoracia rusticana) is in the brassica family, which includes turnips, kale, mustard greens, broccoli rabe, daikon radish and many other plants with varying degrees of pungency and a similar taste. Native to the temperate regions of Europe and Asia, this an ancient herb grown for its pungent roots and is a very easy-to-grow perennial.

Even though you dig up the plant to harvest the roots each year, new plants can (and will) return in the spring from any small pieces of root still in the ground. It is so prolific, it can get out of control if you are not careful, a good reason to grow it in pots!

Though horseradish is used sparingly due to its strong hot flavor, it does add some nutritional benefits to your food. Lots of vitamin C, potassium, calcium and magnesium to name a few. When ground, the root produces isothiocyanates, chemical compounds that are studied for their anti-cancer properties.

It's leaves are fabulous as peppery salad greens too, but the true value of this plant is in the wonderful horseradish root sauce that you can produce. The roots are chopped, grated or minced, and usually mixed with vinegar, bottled and then used as a condiment. The stuff you buy in the store doesn't even compare! Makes the best horseradish crusted salmon!


How to get started

For best results start with a selection of root cuttings from a reputable grower, or from a garden centre or gardening catalogue. Organic gardeners all over the world will share horseradish roots to get people started. If you know anyone with a horseradish plant already, these can be great sources for your 'starter' root. 


When to plant horseradish

If you are going to grow your horseradish in the garden rather than a pot, choose a sunny location and allow for at least 18 to 20 inches between plants. They will get to around 3 feet in height as well. With very large leaves, which can shade out most other plants grown nearby. Thankfully, they also shade out most of the weeds.

Planting should be done as soon as your ground is thawed enough to dig. You’ll want to dig down at least twice as deep as your piece of horseradish root is long to provide loose soil for the long taproot.

Purchased roots for starting horseradish usually have a square cut at the bottom and a slanted cut at the top, so you can tell which way is up. Bury the root standing “upright” with the slanted cut at the top, just above the soil level. If you buy a root without any clear top to it, you’re better off planting the root horizontally just a few inches under the soil and let the plant figure it out.

Keep the soil moist until you start to see sprouts coming up. Continue regular watering to keep the soil moist until the plant has developed several sets of leaves. Then it should be fine with just rainfall on its own.
Though horseradish will thrive even when neglected, you can help your plants out with a mid-summer application of a low-nitrogen fertilizer. A standard formula will promote too much leaf growth at the expense of the roots.

While the plants are growing, you can actually pick a few of the young leaves and add them to salads. They can be kind of spicy, so only try a few. Later in the season, your plants may go to flower. Horseradish blooms are small, white and not particularly showy. They won’t harm your future root harvest so don’t feel you have to cut them off like with many other herbs.

Horseradish is in the same family as broccoli and cabbage, so be prepared for the same host of insect pests as you find with these other vegetables. In particular, keep an eye out for cabbage worms. They are the larvae of a white butterfly that will lay its eggs on the leaves. They prefer cabbage but will be happy to feast on your horseradish if it’s nearby. Look for slim green caterpillars, and pick them off immediately.

Because horseradish can spread mercilessly through your garden, many people prefer to grow it in containers. You will need a very large pot to allow your plant to really thrive. A 20 gallon pot, or even a half-barrel is the best. Make sure there is good drainage and plenty of holes in the bottom.

Harvesting horseradish

You can either harvest your horseradish in the autumn after the first hard frost has killed back the top portions of the plant, or in the early spring just before new sprouts form. The root flavor intensifies quite a bit after a frost but if you prefer milder horseradish, then harvest a bit earlier.
Gently dig up your plants and cut away all the thick roots. To start new plants for the next year, leave one or two pieces in the soil. This will work fine to start new plants even if you are harvesting in the fall.

Quite often, you will have new plants spring up even if you don’t intend it. If you really don’t want any more horseradish plants, you will have to thoroughly dig the soil to remove all the pieces of roots.

Preparing horseradish

Once you grate horseradish root, it will soon start to turn dark unless you mix with vinegar. Once vinegar is added (usually referred to as prepared horseradish at this point), you can store it in the fridge for 6 weeks.
When you grate your horseradish, do it somewhere well-ventilated. The fumes are very potent can will burn your eyes and nose. Best to keep a window open if you can.


For later use, you can store the whole roots for about 3 months in a container with damp sand. It’s not really the most practical method but horseradish needs to be kept moist. Or you can freeze it once grated. The whole root doesn’t freeze well.
The longer you store your horseradish roots, the less flavorful they will be. That goes for prepared horseradish as well.


Further reading


Tuesday, 25 September 2012

Garlic Growing

Garlic (Allium sativum) is one of the easiest and most satisfying crops you can grow. If you're a beginner, or have a limited amount of space, garlic is the thing for you. It's also an excellent companion plant for fruit trees, nightshades (tomatoes, peppers, potatoes), brassicas (cabbage, kohlrabi, broccoli) and carrots. Reputed to repel slugs, aphids, carrot fly and cabbage worm. An all round miracle crop to have in your garden! 


Buy good stock

For best results start with a head of garlic bought from a reputable grower, or from a garden centre or gardening catalogue.


There are many varieties available, so experiment and try growing at least three or four to find those which you prefer and which do best in your local conditions. We use Purple stripe garlic mostly for its beautiful flavour and ease of growing. Some other good varieties to try include:

  • Creole red garlic (hardnecked)
  • Purple stripe garlic (hardnecked)
  • Solent wight garlic (softnecked)

It is not a good idea to use garlic bought in a supermarket as these are usually varieties for growing in warmer climes, and are often inferior to the robust 'home grown' varieties. 
When to plant garlic

Traditionally garlic is planted on the shortest day of the year and harvested on the longest day of the year - I've personally found December to be fine for planting, but in most years it takes until mid-July for the heads to be ready for lifting. Garlic doesn't need a very rich soil, but does prefer a free draining soil - if yours is heavy dig in some sand or plenty of organic matter like compost before planting.

Break the head into individual cloves, and plant these about 2 inches deep, 6 inches apart, in rows 6 inches apart (i.e. squares). For some of the jumbo varieties you'll need to increase this spacing, but for your standard garlic this will be fine.

Plant with the flat end down the way - the new green shoot will emerge from the pointy end (a horticultural term) and by spring you'll have a good few inches of growth. If you are troubled by crows or pigeons you may wish to net your newly planted cloves as I do, as the birds may lift them just for fun.

Garlic also makes a perfect container plant. Make sure there is enough drainage, and a little growing room around each bulb, and you'll have pots of delicious garlic the following summer.


Otherwise garlic takes very little looking after. Keep weeds down, and water in extended dry spells.


Harvesting garlic


You'll know when the garlic is ready to lift because the tops turn yellow and start to dry out. Once more than half of your crop has done this lift them all gently with a fork, remove any excess soil from the hairy roots and leave them somewhere to dry thoroughly - hanging them inside or out in a sheltered spot is the best way.


Once they are dried you can plait them into braided lengths and store them just about anywhere that isn't too moist or warm. Remember to keep some of the fattest cloves to plant next year - you need never buy supermarket garlic again.


Further reading


Monday, 17 September 2012

Kiwi in Zone 8!

Kiwi's in the UK? Well, here's hoping for some vigorous growth and fruiting, at the very least, some wonderful learning and experimentation. I planted this new Kiwi plant (Actinidia deliciosa) out in July into a large, deep container of store bought compost, the plant grew really well and twirled its way up and beyond the stakes I'd placed for it. Being a hardy climber, it was clear I hadnt estimated the pot size and supporting structure correctly!

In this last few months she(?), he(?) quickly outgrew the first support structure, so it was time to move to a larger and more appropriate container with a sturdy, more permanent support. I built a planter and a trellis specifically for the job, and transplanted in mid September.

By next morning the neighbour cats had been in the planter scratching and snapped one of the vines clean off! Being ever resourceful, I cut that whole vine off and snipped it into shorter 6 inch pieces and put a couple directly into the raised bed,  another under a plastic container into a different planter, and yet another I let stand in a jar of water in the house.

First experiment so soon! I'll see if I get any success rooting any of these pieces, and if they do, which method works best.

Normally a male and a female plant are required to set fruit, I dont know yet which variety I have until its starts to flower. The ratio for producing a good crop is generally 1 male to four female, but my 'small holding' will only be supporting one of each. Once I discover which mine is, I'll get one of the opposite sex!

Kiwi is best grown in full sun and well drained soil, so far it seems pretty happy against the house, growing in a pot. I also planted a couple of strawberry plants in the planter as an under storey, and will see how these two get along.

This is the trellis I built, waiting to get fixed to the wall. I re-used old roofers slats taken down from a structure in the garden, painted it up to match the planter, and now need to affix it in place. Photos and instructions coming soon!


Online resources + information

Here's a great article on Kiwi growing and pruning.
Gorgeous Chocolate Kiwi popsicle recipe.

Thursday, 13 September 2012

Growing Asparagus

dinky asparagus spear peeping out!
Asparagus (asparagus officinalis) is a spring vegetable, a flowering perennial and part of the Lily family, similar to its Allium cousins, onions and garlic. Native to most of Europe, it benefits any garden by being one of the earliest vegetables to crop in the Spring!

When planning to grow asparagus, it pays to prepare the bed and the location well, as a poorly prepared asparagus bed will produce a scant harvest! When determining the ideal growing conditions, one only needs to observe nature. Asparagus grows wild and favours slightly salty (coastal) regions - which can difficult when trying to identify suitable companions - although both parsley and rosemary are thought to be good companions - not many plants like this kind of salty soil structure. As well as difficult suitors, these penickity vegetables also cultivate patience, as the vegetable has a three year pre-amble before the grower is able to harvest fully!

All this said, there's nothing quite like walking out to the garden and cutting fresh asparagus for breakfast!

birdsong and coffee a la miniature!

I finally decided to get my asparagus started last year. Although my own back yard is not anything close to asparagus friendly, I started with both seeds and seedlings, sowing into large pots and containers, which I planned to transplant this season. Hence, sneaking a year forward in that 'three year' growing requirement for new asparagus patches.

The first year saw fairly strong, and rather cute asparagus spears grow and lots of feathery ferns. They were very tempting to harvest, but to promote healthy crowns, it is advisable to not harvest until the third year. So, they were allowed to dieback over the winter. And have appeared again this year, some fairing better than others, but all now in their second year and ready to transplant into a new garden.

Although asparagus is commonly believed to be difficult to plant and cultivate in a regular suburban kitchen garden, I thought that I would get the ball rolling and start planting this year. The spears (in the first picture above) are first year seedlings - it takes three years before full harvesting can take place. I've been wanting to grow my own ever since tasting the wild asparagus I discovered with a friend while wandering the hills of the Okanagan in British Columbia. Those skinny spears melted in our mouths when we ate them later at her place overlooking Okanagan Lake that evening.

If planning to grow asparagus, start by getting familiar with do's and dont's on the internet: Vegetable Gardening Online

Once ready to start your own, an excellent book that provides everything you need for growing is Grow the Best Asparagus (Storey Country Wisdom Bulletin)


So, even though my current garden is a tiny asparagus unfriendly location, I'm glad I decided to start last year, as now I'm in my second year and will be harvesting like crazy next year!

Year two
The plants have taken well in their various containers and planting spaces, I've now moved house and have a bigger garden so I'm carefully transplanting to larger raised beds and into terraced growing spaces at the top of the garden. I've resisted the urge to 'harvest' this year, although some of those tender little shoots have beed especially difficult to ignore! Of the twenty or so plants I put in (a mix of seeds and seedlings) I have had approx 80 percent success rate this year - only a couple have not thrown out little asparagus spears. But, I have rescued the root crowns and planted out, so will wait to see if they make an appearance in year three!

Further reading + resources